Intune for macOS Part 2 - Setup BYOD enrollment and Configure macOS Profiles

Setup BYOD Enrollment
In part 1 , we explored how to setup a macOS virtual machine for testing. Now lets look at actually configuring Intune. The first thing we need to do is get an Apple MDM push certificate.
- Navigate to endpoint.microsoft.com < Devices < Enroll Devices < Apple Enrollment.
- Download the CSR.
- Follow the link “Create your MDM Push Certificate”
- Sign into your Apple ID (or create one if you do not have one)
- Click create certificate. Accept the terms of service.
- Upload the CSR you downloaded from Intune.
- Download the newly created MDM push certificate and upload to Intune.
At this point BYOD enrollment using the company portal app will work, but we need to setup some policies.
See the official Microsoft doc for the BYOD enrollment flow
Configuration Profiles
The official policies supported out of the box in Intune are a bit limited currently.
Currently available configuration policies in Intune:
- Device Features
- Device Restrictions
- Endpoint Protection
- Extensions
- VPN
- Wi-Fi
- Wired networks
For a full listing of including settings, see the official documentation macOS device settings in Microsoft Intune | Microsoft Docs
Create Custom Configuration Profiles
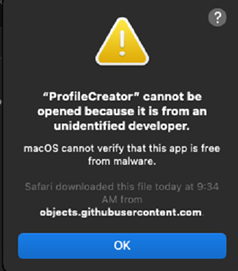
For settings not available in the included policies, we can upload custom config profiles to Intune. To do this officially, you would need Apple server with Apple Profile Manager. I do not have the luxury of having access to apple server, so instead I recommend using Profile Creator over on GitHub. Simply download the latest release version and run on your test VM with macOS.
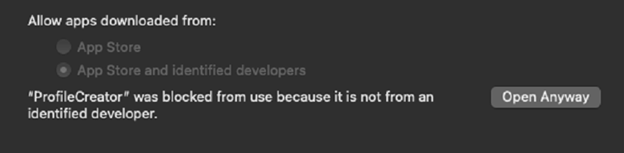
- When you open Profile Creator for the first time, you will get a warning about the app being from an unidentified developer
- Open System preferences, under general, select “Open Anyway”
-
Once you have profile creator open, click the + icon to start a new payload.
-
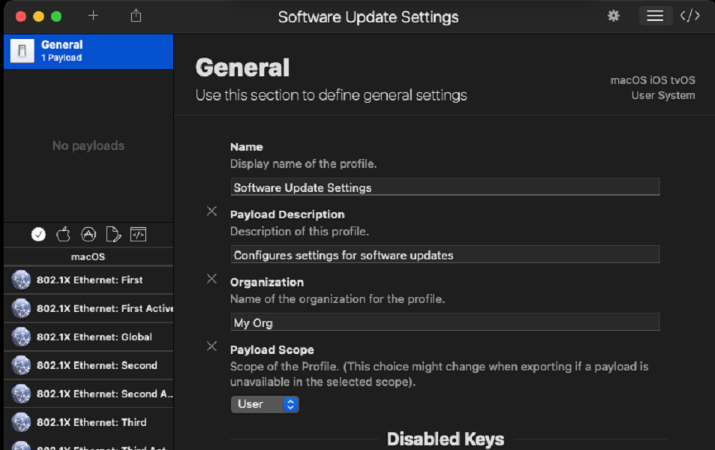
On the general page, enter a name for the profile, a payload description and organization name. For this example, we will create a profile for software update settings.
-
Now, click the settings gear at the top right and under platform, uncheck iOS and tvOS.
-
The lefthand pane displays a list of all avaliable profiles. Select the profile you wish to create, in this case “Software Update”
-
Click + next to the settings you would like to add to the profile. Once you are done, click the add button at the top right.
-
Save and export the file. The default save location is the documents folder.

Upload custom profile to Intune
Now that we have the profile settings saved to an xml file, we can upload it to Intune.
-
Go to Device < Configuration Profiles < Create Profile < macOS < Templates < Custom
-
Create a profile name, select the appropriate deployment channel, upload the exported profile, then assign to the appropriate user group.
You can find the custom profiles I have created here https://github.com/djust270/macOS-Intune-Profiles
In the next part, I will cover software deployment using shell scripts.